Azure Synapse Analytics is Microsoft’s one-stop shop that integrates big data analytics and data warehousing. It features Apache Spark pools to provide scalable and cost-effective processing power for Spark workloads which enables you to quickly and easily process and analyse large volumes of data at scale.
I have been working with Spark environment on Azure Synapse for a while and thought of documenting the experience I had with installing external python libraries for Spark pools on Azure. This guideline may come handy for you if you are performing your big data analytics experiments with specific python libraries.
Apache Spark pools on Azure Synapse Workspaces comes with Anaconda python distribution and with pip as a package manager. Most of the native python libraries used in the data analytics space are already installed. If you need any additional packages to be installed and used within your scripts, there are 3 ways you can do it on Synapse.
Use magic command on notebooks to install packages in session level.
Upload the python package as a workspace package and install in Spark pool.
Install packages using PIP or conda input file.
01. Use magic command on notebooks to install packages in session level.
Install packages for session level on Notebooks
This is the most simple and straight forward way of installing a python package in Spark session level. You just have to use the magic command followed up with the usual pythonic way of installing the package through pip or conda. Though this is easy for prototyping and quick experiments, it’s pointless if you are installing it over and over again when you start a new spark session. Better to avoid this method in production environments. Good for rapid prototyping experiments.
02. Upload the python package as a workspace package and install in Spark pool.
Upload python libraries as workspace packages
Azure Synapse workspace allows to have workspace packages uploaded and install on the Spark pools. It accepts python wheels (.whl files), jar files or tar.gz as packages.
After uploading the packages go for specific Apache Spark pool and then select the packages you want to install on it. The initial installation may take few minutes. (In my case, it took around 20 mins to install 3 packages)
With the experience I had with different python packages, I would stick with python wheels from pip or jars from official package distributions. I tried sentence-transformers tar.gz file from pyPI (https://pypi.org/project/sentence-transformers/ ). It gave me an error during the installation process mentioning a package dependency with R (which is confusing)
03. Install packages using PIP or conda input file.
Upload the requirement files
If you are familiar with building conda environments or docker configurations, having a package list as a config file should not be new to you. You can specify either a .txt file or an .yml file with the desired package versions to be installed to the Spark cluster. If you want to specify a specific channel to get libraries, you should use a .yml file.
For an example if you need to install sentence-transformers package and spark-nlp python packages which are used in NLP for the Spark environment, you should add these two line in a .txt file and upload it as the input file for the workspace.
sentence-transformers===2.2.2
spark-nlp===4.4.1
I find this option as the most robust way of installing python packages to a Spark since it gives you the flexibility to select the desired package version and the specific channel to use during installation. It saves the time from installing the packages each time when the session get refreshed too.
Let me know your experience and the lessons learned during experiments with Apache Spark pools on Azure Synapse Analytics.
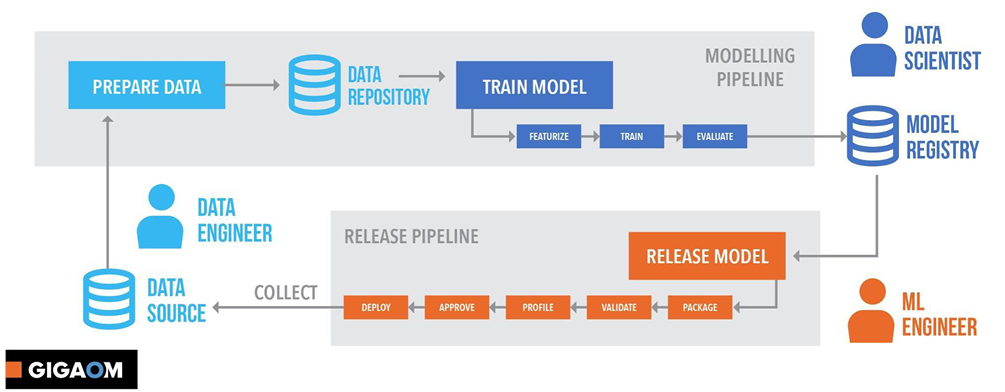
What’s all this hype on MLOps? What’s the difference between machine learning and MLOps? Is MLOps essential? Why we need MLOps? Through this article series we going to start a discussion on MLOps to get a good start with the upcoming trend. The first post is not going to go deep with technicalities, but going to cover up essential concepts behind MLOps.
What is MLOps?
As the name implies, it is obviously having some connection with DevOps. So, will see what DevOps is first.
“A compound of development (Dev) and operations (Ops), DevOps is the union of people, process, and technology to continually provide value to customers.”
Microsoft Docs
This is the formal definition of DevOps. In the simpler terms, DevOps is the approach of streamlining application development life cycle of software development process. It ensures the quality engineering and security of the product while making sure the team collaboration and coordination is managed effectively.
Imagine you are a junior level developer in a software development company who develops a mission critical system for a surveillance application. DevOps process make sure each and every code line you write is tracked, managed and integrated to the final product reliably. It doesn’t stop just by managing the code base. It involves managing all development life cycle steps including the final deployment and monitoring of the final product iteratively too.
That’s DevOps. Machine Learning Operations (MLOps) is influenced by DevOps principles and practices to increase the efficiency of machine learning workflows. Simply, it’s the way of managing ML workflows in a streamlines way to ensure quality, reliability, and interpretability of machine learning experiments.
Is MLOps essential?
We have been playing around with machine learning experiments with different tools, frameworks and techniques for a while. To be honest, most of our experiments didn’t end up in production environments :D. But, that’s the ultimate goal of predictive modeling.
Building a machine learning model and deploying it is not a single step process. It starts with data collection and goes in an iterative life cycle till monitoring the deployed model in the production environment. MLOps approaches and concepts streamline these steps and interconnect them together.
Answer is Yes! We definitely need MLOps!
Why we need MLOps?
As I said earlier, MLOps interconnect the steps in ML life cycle and streamline the process.
I grabbed these points from Microsoft docs. As it implies, these are the goals of MLOps.
Faster experimentation and development of models
Good MLOps practices leads for more code and component reusability which leads for faster experiments and model development. For an example, without having separate training loops or data loading components for each experiment, we can reuse an abstract set of methods for those tasks and connect them with a machine learning pipeline for running different experiment configurations. That’s make the life easy of the developer a lot!
I do lot of experiments with computer vision. In my case, I usually have a set of abstract python methods that can be used for model training and model evaluation. When performing different experiments, I pass the required parameters to the pipeline and reuse the methods which makes the life easy with less coding hassle.
Faster deployment of models into production
Machine learning model deployment is always a tricky part. Managing the endpoints and making sure the deployment environment is having all the required platform dependencies maybe hard to keep track with manual processes. A streamlines MLOps pipeline helps to manage deployments by enabling us to choose which trained model should go for production etc. by keeping track of a model registry and deployment slots.
Quality assurance and end-to-end lineage tracking
Maintaining good coding practices, version controlling, dataset versioning etc. ensures the quality of your experiments. Good MLOps practices helps you to find out the points where errors are occurring easily rather than breaking down the whole process. Will say your trained model is not performing well with the testing data after sometime from model deployment. That might be caused by data drift happened with time. Correctly configured MLOps pipeline can track such changes in the inference data periodically and make sure to notify such incidents.
Trustworthiness and ethical AI
This is one of the most important use cases of MLOps. It’s crucial to have transparency in machine learning experiments. The developer/ data scientist should be able to interpret each and every decision they took while performing the experiment. Since handling data is the key component of ML model, there should be ways to maintain correct security measures in experiments too. MLOps pipelines ensure these ethical AI principles are met by streamlining the process with a defined set of procedures.
How we gonna do this?
Now we all know MLOps is crucial. Not just having set of python scripts sitting in a notebook it’s all about interconnecting all the steps in a machine learning experiments together in an iterative process pipeline. There are many methods and approaches to go forward with. Some sits on-prem while most of the solutions are having hybrid approach with the cloud. I usually use lot of Azure services in my experiments and Azure machine learning Studio provides a one-stop workbench to handle all these MLOps workloads which comes pretty handy. Let’s start with a real-world scenario and see how we can use Azure Machine Learning Studio in MLOps process to streamline our machine learning experiments.
It’s almost 7 years since I started playing with machine learning and related domains. These are some FAQs that comes for me from peers. Just added my thoughts on those. Feel free to any questions or concerns you have on the domain. I’ll try my best to add my thoughts on that. Note that all these answers are my personal opinions and experiences.
01. How to learn the theories behind machine learning?
The first thing I’d suggest would be ‘self-learning’. There are plenty of online resources out there where you can start studying by your own. Most of them are free. Some may need a payment for the certification (That’s totally up to you to pay and get it). I’ve listed down some of the famous places to get a kickstart for learning AI. Just take a look here.
Next would be keep practising. Never stop coding and training models in various domains. Kaggle is a good place to sharpen your skill set. Keep learning and keep practising at the same time.
02. Do we really need mathematics for ML?
Yes. To some extend you should know the theories behind probability and and some from basic mathematics. No need to worry a lot on that. As I said previously, there are plenty of places to catch up your maths too.
03. Is there a difference between data analysis and machine learning?
Yes. There is. Data analysis is about find pattern in the prevailing data and obtain inferences due to those patterns. It may have the data visualization components too. When is comes to machine learning, you train a system to learn those patterns and try to predict the upcoming pattern.
04. Does the trend in AI/ML going to fade out in the near future?
Mmm.. I don’t think so. Can’t exactly say AI is going to be ‘the’ future. Since all these technical advancements going to generate hell a lot of data, there should be a way to understand the patterns of those data and get a value out of that. So, data science and machine learning is going to be the approach to go for.
Right… those are some general questions I frequently get from people. Let’s move into some technicalities.
05. What’s the OS you use on your work rig?
Ubuntu! Yes it’s FOSS and super easy to setup all the dependencies which I need on it. (I did a complete walk through on my setup previously. Here’s it). Sometimes I use Windows too. But if it’s with docker and all, yes.. Ubuntu is the choice I’m going with.
06. What’s your preferred programming language to perform machine learning experiments?
I’m a Python guy! (Have used R a little)
07. Any frameworks/ libraries you use most in your experiments?
Since am more into deep learning and computer vision, I use PyTorch deep learning framework a lot. NumPy, Sci-kit learn, Pandas and all other ML related Python toolkits are in my toolbox always.
08. Machine learning is all about neural networks right?
No it’s not! This is one of the biggest myths! Artificial neural networks (ANNs) are only one family of algorithms which we can perform machine learning. There are plenty of other algorithms which are widely used in performing ML. Decision trees, Support Vector Machines, Naive Bayes are some popular ML algorithms which are not ANNs.
09. Why we need GPUs for training?
You need GPUs when you need to do parallel processing. The normal CPUs we have on our machines are typically having 4-5 cores and limited number of threads can be handled simultaneously. When it comes to a GPU, it’s having thousands of small cores which can handle thousands of computational threads in parallel. (For an example Nvidia 2080Ti is having 4352 CUDA cores in it). In Deep learning, we have to perform millions or calculations to train models. Running these workloads in GPUs is much faster and efficient.
10. When to use/ not to use Deep learning?
This is a tricky questions. Deep learning is always good in understanding the non-linear data. That’s why it’s performing really well in computer vision and natural language processing domains. If you have a such task, or your feature space is really large and having a massive amount of data, I’d suggest you to go with deep learning. If not sticking with traditional machine learning algorithms might be the best case.
11. Do I need to know all complex theories behind AI to develop intelligent applications?
Yes and No. In some cases, you may have to understand the theories behind AI/ML in order to develop a machine learning based applications. Mostly I would say model training and validation phases need this knowledge. Will say you are a software developer who’s very good with .Net/ Java and you are developing an application which is having a component where you have to read some text from a scanned document. You have to do it using computer vision. Fortunately you don’t have to build the component from the scratch. There are plenty of services which can be used as REST endpoints to complete the task. No need to worry on the underlying algorithms at all. Just use the JSON!
12. Should I build all my models from scratch?
This is a Yes/No answer too. This question comes mostly with deep learning model development. In some complex scenarios you may have to develop your models from the scratch. But most of the cases the problem you having can be defined as a object detection/ image classification/ Key phrase extraction from text etc. kinda problem. The best approach to go forward would be something like this.
Use a simple ANN and see your data loading and the related things are working fine.
Use a pre-trained model and see the performance (A widely used SOTA model would be the best choice).
If it’s not working out, do transfer learning and see the accuracy of the trained model. (You should get good results most of the times by this step)
Do some tweaks to the network and see if it’s working.
If none of these are working, then think of building a novel model.
13. Is cloud based machine learning is a good option?
In most of the industrial use cases yes! Since most of the data in prevailing systems are already sitting in the cloud and industries are heavily relying on cloud services these days, cloud based ML is a good approach. Obviously it comes with a price. When it comes to research phases, the price of purchiasing computation power maybe a problem. In those cases, my approach would be doing the research phase on-prem and moving the deployment to the cloud.
14. I’ve huge computer vision datasets to be trained? Shall I move all my stuff to the cloud?
Ehh… As I said previously, if you planning on a research project, which goes for a long time and need a lot of computational hours, I’d suggest to go with a local setup first, finalize the model and then move to the cloud. (If dollars aren’t your problem, no worries at all! Go for the cloud! Obviously it’s easy and more reliable)
15. Which cloud provider to choose?
There’s a lot of cloud providers out there having various services related to ML. Some provides out of the box services where you can just call and API to do the ML tasks (Microsoft Cognitive services etc. ). There are services where you can use your own data to train prevailing models (Custom Vision service by Azure etc.)
If you want end-to-end ML life cycle management, personally I find Azure ML service is a good solution since you can use any of your ML related frameworks and tools and just use cloud to train, manage and deploy the models. I find MLOps features that comes with Azure Machine Learning is pretty useful.
16. I’ve trained and deployed a pretty good machine learning model. I don’t need to touch that again right?
No way! You have to continuously check their performance and the accuracy they are providing for the newest data that comes to the service. The data that comes into the service may skewed. It’s always a good idea to train the model with more data. So better to have a re-training MLOps pipelines to iteratively check your models.
17. My DL models takes a lot of time to train. If I have more computation power the things will speed up?
mm.. Not all the time. I have seen cases where data loading is getting more time than model training. Make sure you are using the correct coding approaches and sufficient memory and process management. Make sure you are not using old libraries which may be the cause for slow processing times. If your code is clean and clear then try adjusting the computation power.
This is just few questions I noted down. If you have any other questions or concerns in the domain of machine learning/ deep learning and data science, just drop a comment below. Will try to add my thoughts there.
Deep neural networks are complex! Literally it takes quite an amount of effort and time to make them work near to perfect. Despite the effort you put on fitting the model well with your data and getting an admirable accuracy you have to keep your eye on model efficiency and performance. Sometimes it’s a trade-off between the model accuracy and the efficiency in inference. In order to do this, analysing the memory and computation usage of the networks is essential. This is where profiling neural networks comes in to the scene.
Since PyTorch is my preferred deep learning framework, I’ve been using PyTorch profiler tool it had for a while on torch.autograd.profiler . It was pretty sleek and had some basic functionalities for profiling DNNs. Getting a major update PyTorch 1.8.1 announced PyTorch Profiler, the imporved performance debugging profiler for PyTorch DNNs.
One of the major improvements it has got is the performance visualisations attached with tensorboard. As mentioned in the release article, there are 5 major features included on PyTorch Profiler.
Distributed training view
Memory view
GPU utilization
Cloud storage support
Jump to course code
You don’t need to have extensive set of codes for analyzing the performance of the network. Just a set of simple Profiler API calls. To get the things started, let’s see how you can use PyTorch Profiler for analyzing execution time and memory consumption of the popular resnet18 architecture. You may need to have PyTorch 1.8.1 or higher to perform these actions.
import torch
import torchvision.models as models
from torch.profiler import profile, record_function, ProfilerActivity

use_cuda = torch.cuda.is_available()
device = torch.device("cuda:0" if use_cuda else "cpu")

#init simple resnet model
model = models.resnet18().to(device)

#create a dummy input
inputs = torch.randn(5,3,224,224).to(device)

# Analyze execution time
with profile(activities=[
        ProfilerActivity.CPU, ProfilerActivity.CUDA], record_shapes=True) as prof:
    with record_function("model_inference"):
        model(inputs)

#print the output sorted with CPU execution time
print(prof.key_averages().table(sort_by="cpu_time_total", row_limit=10))


#Analyzing memory consumption
with profile(activities=[ProfilerActivity.CPU, ProfilerActivity.CUDA],
        profile_memory=True, record_shapes=True) as prof:
    model(inputs)

#print the output sorted with CPU memory consumption
print(prof.key_averages().table(sort_by="self_cpu_memory_usage", row_limit=10))
Output from the execution time analysisOutput from the memory consumption analysis
Will do discuss on using Profiler visualizations for analyzing model behaviours in the next post.
I blogged on some of the challenges I face with my deep learning based experiments and the approaches I used for overcoming those challenges in previous blog posts. This is going to be one of them where I’m going to explain a technique I used for calculating perspective relationship between two different planes in a computer vision application.
Background :
Computer vision is widely used in surveillance applications, object detection and sports analytics. Mapping the imagery/ video footage generated from a single camera or from set of cameras to a relative space is one of the major tasks we may have to deal with. Mostly this need comes with mapping people/ object locations.
Use Case –
Imagine a sports analytics application where you capture a soccer game from a fixed camera and run a human detection algorithm on the image to find out the player positions. That’s quite straightforward. (You can see that has been done in the following figure). The tricky part is mapping the player positions which are in the camera space to the actual soccer field coordinate and generate graph with player positions relative to the soccer field (or you may want to normalize the location coordinates) . What we need was an output similar to the left bottom one in the figure.
We can clearly understand that soccer field is rectangular in shape. So that, if we know the frame-space location coordinates of the 4 corners of the field, we can easily transform any point inside that polygon for a given coordinate space. In geometry this is called “perspective transformation” . (This is bit different from affine transformation which is a common application.)
Perspective transformation
If you interested in digging deep and see how this mathematical transformation is happening, I strongly encourage you to follow this link and see the related matrix calculations behind this operation.
I found out a pretty neat JavaScript snippet by Florian Segginger and I did ported the logic to a python script.
1. Coordinates of the corner 4 points of the polygon to be transformed
2. Coordinate/ coordinates of the points to be transformed
3. 4 corner points of the transformed polygon (This can be a rectangle or any 4 point polygon)
perspective_transform method will get the input polygon coordinates and point coordinates and output the resultPoint perspective to the resultRect we have defined. (In this code I’ve used a 1-1 plane to map the points)
Feel free to use this method in your applications and let me know your thoughts on this. Cheers!
When it comes to real world data collections, we don’t have the prestige of having perfectly balanced labelled datasets for training models. Most of the machine learning algorithms are not immune for imbalanced classes and cause less accurate and biased models. There are many approaches that we can follow to tackle imbalanced data problem. Either we have to choose a ML algorithm which is reluctant for imbalanced data or we may have to generate synthetic data in order to make the classes balanced.
Neural networks are trained using backpropagation which treats each class same when calculating the loss. If the data is not balanced, that makes the model bias for one class than another.
A, B, C, D classes are imbalanced
I had to face this issue when experimenting with a computer vision based multi-class classification problem. The data I had was so much skewed and some classes had a very less amount of data compared to the majority class. Model was not performing well at all and need to take some actions to tackle the class imbalance problem.
These were the solutions I thought of try out.
Creating synthetic data – Creating new synthetic data points is one of the main methods which is used mostly for numerical data and in some cases in imagery data too with the help of GAN and image augmentations. As in the starting point, I took the decision not to go with synthetic data generation since it may introduce abnormal characteristics to my dataset. So I keep that for a later part.
Sampling the dataset with balanced classes – In this approach, what we normally do is, sample the dataset similar number of samples for each data label. For an example, will say we have a dataset which is having 3 classes named A, B & C with 100, 50, 20 data points for each class accordingly. When sampling what we do is randomly selecting 20 samples from each A, B & C classes and get a dataset with 60 data points.
In some cases this approach comes as a better option if we have very large amounts of data for each class (Even for the minority classes) In my case, I was not able to take the cost of loosing a huge portion of my data just by sampling it based on the data points having in the minority class.
Since both methods were not going well for me, I used a weighted loss function for training my neural network. Since this is a multi-class classification problem, I used Cross Entropy Loss in PyTorch as my loss function. (You can follow the similar approach if you using BCELoss for binary classification too)
import torch.nn as nn

#class weights for 6 class multi-class classification
class_weights = [0.5281, 0.8411, 0.9619, 0.8634, 0.8477, 0.9577]

#loss function with class weights
criterion = nn.CrossEntropyLoss(weight = class_weights)
How I calculated the weight for each class? –
This is so simple. What I did was calculating a manual re-scaling weight for each class and pass it to “weight” parameter in the loss function. Make sure that you have a Tensor with the size of number of classes as the class weights. (In simpler words each class should have a weight).
Hint : If you using GPU for model training, make sure to put your class weights tensor to the GPU too.
Did it worked? Hell yeah! I was able to train my model accurately with less bias and without overfitting for a single class by using this simple trick. Let me know any other trick you use for training neural network models with imbalanced data.
Machine learning or deep learning is not all about algorithms and training predictive models on some set of data. It involves a wide range of tools, techniques and computing approaches to handle various steps of the machine learning process pipeline.
Starting from a raw data point, to the stage of exposing the model as a REST API there are numerous places where we need to pay attention on data handling approaches. (Yes! Data is the key component of any ML/DL pipeline.)
In this article am bringing out a problem I faced when dealing with a deep learning experiment and the approach I took to overcome the problem. I’m pretty sure you may have to face similar kind of issues if you using massive amounts of structured/ unstructured data for training your deep learning models.
Here’s the issue I faced :
In order to train a computer vision related deep learning model I had to write a PyTorch custom dataloader for loading a set of annotation data. The data points were stored in JSON format and believe me, that massive JSON file was nearly 4GB! It was not a simple data structure with keys and values, but had a mixed set of data structures including lists, single float values and keys in String format.
As usual I wrote a PyTorch custom dataset class and tried to load the massive JSON file inside init . Yp! It crashed! Memory was not enough for handling such a big file. Can’t you move that for getitem ? No. It’s not possible. Loading file on call is so inefficient and I had to think of solution which doesn’t load the massive file as a whole for the RAM and with the possibility of retrieving data inside the file with indexes.
The first dumb idea I got was converting the data into a multidimensional numpy array and save the file, but I figured out that gives the birth for another massive file which doesn’t solve my problem. With a suggestion I got from my co-supervisor, I started looking on HDF5; Hierarchical Data Format. Yes! It was the solution and it nicely solved my issue.
What is Hierarchical Data Format (HDF5) ?
The Hierarchical Data Format version 5 (HDF5), is an open source file format that supports large, complex, heterogeneous data. This uses a ‘directory-like’ structure to store data. In simpler terms, a HDF5 file can be identified as a definition of a file system (the way files and directories are stored in your computer) in a single file.
There are two important terms used in HDF5 format.
Groups – Folder like element within the HDF5 file which can contain subgroups or datasets.
Dataset – Actual data contained within the HDF5 file. (Numpy arrays etc. )
In simpler terms, if your data is large, complex, heterogeneous and need random access most probably HDF5 would be the best option you can go forward with.
How to use HDF5?
We all speak Python when it comes to machine learning. Python supports HDF5 format using h5py package. Since this is a wrapper based on native HDF C API, it provides almost the full functionality.
Create HDF5 file from a JSON array
Here I included a very brief code snippet of creating a HDF5 file from a JSON array which contains the data from famous iris dataset. This is a sample of JSON array I used. (You can get the full dataset from here)
Here I created a separate group for each entry. (3 JSON objects in the array means 3 groups in HDF5 file.) The 5 datapoints in each object are stored as datasets.
import numpy as np
import json
import h5py
import os

hdf5_filename = 'iris_hdf5.hfd5'

#read iris.json file
with open('iris.json') as jsonfile:
    iris_data = json.load(jsonfile)

#create HDF5 file
h = h5py.File(hdf5_filename, 'w')

#running a loop through all entries in the JSON array
index = 0
for entry in iris_data:
    for k, v in entry.items():
        dataset_name = os.path.join(str(index), k) #groups are divided by '/'
        h.create_dataset(dataset_name, data = np.asarray(v, dtype=np.float32))
    index = index +1
h.close()
print('Iris data HDF5 file created.')


#read data from HDF5
h_read = h5py.File(hdf5_filename, 'r')

#read a single entry

h_read['0'].keys()
# output : <KeysViewHDF5 ['petalLength', 'petalWidth', 'sepalLength', 'sepalWidth', 'species']>
np.asarray(h_read['0']['petalLength'])
# output : array(1.4, dtype=float32)

h_read.close()
Though this is a very simple data structure, you can expand this to complex and large files. You’ll find it pretty easy to use HDF5 instead of using huge lists inside init of custom dataloaders. Here’s a rough sketch of the PyTorch custom dataset class I created for the above example.
import torch
import h5py
from torch.utils.data.dataset import Dataset

hdf5_filename = 'iris_hdf5.hfd5'

class MyCustomDataset(Dataset):
    def __init__(self, ...):
        # # All the data preperation tasks can be defined here
        # - HDF5 file is referenced here.
        h_read = h5py.File(hdf5_filename, 'r')

    def __getitem__(self, index):
        # # Returns data and labels
        # - access HDF5 file through indexing
        item = np.asarray(h_read[index]['petalLength'])
        return item

    def __len__(self):
        return count # of how many examples you have
This is only one usage of using HDF5 file format in machine learning. Share your experiences with HDF5 here too. 🙂
In the last blog post, we discussed on developing a machine learning classifier with Azure machine learning service. As mentioned there, we going to utilize the familiar development tools and frameworks for model development.
Key areas of the SDK include:
Explore, prepare and manage the lifecycle of your datasets used in machine learning experiments.
Manage cloud resources for monitoring, logging, and organizing your machine learning experiments.
Train models either locally or by using cloud resources, including GPU-accelerated model training.
Use automated machine learning, which accepts configuration parameters and training data. It automatically iterates through algorithms and hyperparameter settings to find the best model for running predictions.
Deploy web services to convert your trained models into RESTful services that can be consumed in any application.
AzureML python SDK acts as the connector between all the resources on the cloud and the dev environment.
Installing Python SDK –
AzureML SDK can be easily installed for your local computer through pip. Refer this guide for the installation process. I’d suggest to go with default installation since it’s enough for the most of the operations we used in the experiment. It’s a good idea to upgrade the SDK before running an experiment since the package is rapidly updating.
Download config file –
For connecting the AzureML workspace, we may need the Azure subscription ID, resource group which the workspace has been created and the workspace name. The easiest way to grab these details is downloading the config.json file from the Azure portal. Place this file inside the experiment directory.
Downloading config.json from Azure portal
Connect AzureML Workspace –
Connecting the AzureML workspace and and listing the resources can be done by using easy python syntaxes of AzureML SDK (A sample code is provided below). Refer Python SDK documentation to do modifications for the resources of the AML service.
#!pip install --upgrade azureml-sdk[notebooks]
import azureml.core
from azureml.core import Workspace
from azureml.core import ComputeTarget, Datastore, Dataset

print("Ready to use Azure ML", azureml.core.VERSION)
ws = Workspace.from_config()
print(ws.name, "loaded")

#View resources in the workspace
print("Compute Targets:")
for compute_name in ws.compute_targets:
    compute = ws.compute_targets[compute_name]
    print("\t", compute.name, ":", compute.type)

print("Datastores:")
for datastore in ws.datastores:
    print("\t", datastore)

print("Datasets:")
for dataset in ws.datasets:
    print("\t", dataset)

print("Web Services:")
for webservice_name in ws.webservices:
    webservice = ws.webservices[webservice_name]
    print("\t", webservice.name)
In next blog article, will discuss the data loading and experiment creation.
Azure Machine Learning Service is becoming the one-stop place for managing all ML related workloads in Azure cloud. There are two main advantages of using Azure Machine Learning Service for your ML and data science experiments.
#1 – You can mange the whole machine learning workflow in a single environment. From data wrangling to machine learning service deployment, everything is managed on the cloud with its reliable, scalable and efficient services.
#2 – You can use your familiar open source toolset, languages and frameworks in model development. Being a ML engineer or a data scientist, you may be using python or R as your main development languages. Azure machine learning allows you to use any of those languages and frameworks to develop the experiments.
Pima Indians Diabetes Classification is one of the most famous machine learning experiments. It’s a binary classification problem which use a .CSV based tabular dataset as the input. I’ll walk you through the process I went through to perform my experiment.
Scenario:
Diabetes dataset is available as a .CSV file in your local file system.
I have to build a binary classifier trained with the dataset and deploy it as a web service with a REST endpoint.
Solution:
As shown in the diagram I used the services and tools in AMLS with my typical development environments to build up the solution.
Step 1: Since the experiment is going to build on Azure cloud, I have transferred my dataset into an Azure blob storage. I used Azure storage Explorer to upload the dataset into the cloud. (For better performance, make sure the dataset is in a storage blob in the same region where the AMLS experiment is)
Step 2: In order to access the data stored in the blob space, it’s registered inside AMLS as a datastore.
Step 3: AMLS supports two types of datasets. Since the .CSV file contains tabular data, it’s registered as a tabular dataset. (You can perform the basic statistical operations and visualizations after registering as a tabular dataset.)
Step 4: Now it’s the time for the real job. Since am more familiar with Python and sci-kit learn, I used those languages and libraries to develop my model. The whole coding part has been done on a Linux machine using my favorite VSCode IDE. 😉 You may wonder how I’m going to connect the code base on my local machine with the cloud… Here’s the place where AzureML python SDK comes to the rescue.
Step 5: I don’t have enough computation power to do the model training on my machine. So that, I use an Azure compute cluster to perform the computation. (In my experiment I did hyperparameter tuning to select the best parameters. Using the compute cluster allowed me to perform parallel training)
Step 6: After model training and getting the desired inference accuracy, I had the need of exposing the binary classification model as a web service. For that, I used Azure Container Instance (ACI) since this is going to be a small testing experiment. (I may have to go for an Azure Kubernetes Services (AKS) if I wanna go for global massive deployment)
Yp! It’s just a simple 6 step process. Complex? Don’t worry, I’m going to walk you through the whole process assisted with the code snippets in the upcoming blog posts. Stay tuned. Let’s start a real experiment with Azure Machine Learning Service.
Out of all the public cloud platforms, Microsoft Azure has adopted all most all the steps in machine learning life cycle into cloud. Though the resources and the abilities are there, sometimes finding the correct cloud-based product or service to adopt for your solution might be a problem.
Providing a perfect answer for that issue, Azure has come up with the whole new Azure Machine Learning Studio which is in the preview by the time am blogging this! (Don’t get confused with the AzureML Studio, the drag and drop interface we had before. This is a new thing – ml.azure.com ) There’s no framework dependency or restrictions for using these services. You can easily adapt your open source machine learning code base (may be written with Python, sci-kit learn, TensorFlow, PyTorch, Keras… anything)
In order to use this one-stop solution in Azure you may have to create an Azure Machine Learning Service from Azure portal. Then it’ll direct you for the new interface. You can either go for the Enterprise pricing tier or for the Basic tier. In basic tier you won’t get the visual designer and Automated ML features.
Launching the Studio through Azure portal
Let’s go through each and every tab we got in the side pane in the latest release and see what can we do with them.
Notebooks –
These are fully managed Jupyter notebook instances on cloud. These notebook servers are running on top of a new VM instance type called “notebookVM”. There notebookVMs are fully configured work environments to do your machine learning and data science tasks. No need to worry about installing all the python packages and its dependencies. All are already there! You have the privilege to change the notebook sizes (Yes GPU enabled VMs are also there) or install new packages through a python package manager too.
Automated ML –
Not available in the free tier though. A process of selecting the best suited algorithm for the dataset you are having. Right now, this is supporting classification, regression and time series forecasting for tabular data formats. Not supported for deep learning based computer vision applications. Deep learning based text analysis is also in preview. The Automated ML process runs a set of machine learning algorithms on top of your provided data and see which one gives the best accuracy metric. Good for building prototypes and even in some cases might be in production.
Designer –
This is the evolution of Azure ML Studio (Old drag and drop thing). Seems like Microsoft is going to end its lifecycle and give the new Designer be its replacement. Here you can build the complete ML workflow by dragging and dropping modules. If you want can integrate R or python scripts in the experiment. The machine learning service endpoint can be exposed through a Azure Kubernetes Service (AKS) deployment.
Datasets –
The place to manage and version your datasets. Datasets can be either tabular or file based. Here you can profile your dataset by performing a basic statistical analysis on your data. If your dataset is sitting on a datastore (which we going to discuss later) this acts as a high-level encapsulation of that data.
Experiments –
You may execute several runs on the same experiment with different configurations. This is the place where you can see all the log files of them and compare the runs with each other.
Pipelines –
Don’t get confused Azure machine learning pipelines with the Azure pipelines. Azure ML pipelines are specifically designed for MLOps tasks. You can manage the whole experiment process till production using ML pipelines. These pipelines are reusable and help collaborative development of the solution.
Models –
You can register the trained ML models here. Versioning the models, managing which model to go for production are some use cases of this model registry. You can register models that has been trained outside the particular Azure ML workspace too here.
Endpoints –
Endpoint of an azure machine learning experiment can be a web service or an IoT module endpoint. Managing the endpoint keys etc. are performed in this section.
Compute –
In most of the cases, you may use Azure for computations. Here in the Compute section you can create and manage the following compute resource types.
Notebook VMs – as we discussed previously in the Notebooks section this is a fully managed ML development environment suits for development and prototyping purposes.
Training clusters – You can make a either a CPU based or a GPU based cluster for running your experiments. Note that this would be charged according to the computation hours as well as for the number of nodes you are using. Good thing is there’s no charge when you are not using the cluster for computation.
Inference clusters – This talk about AKS clusters where you can deploy the endpoints. Even you can register a prevailing AKS cluster as an inference cluster.
Attached compute – If you working with Azure Databricks, Data Lake Analytics or HDInsight you can configure the computation here. In an interesting use case if you want to attach your physical computer (which should be a workstation running Ubuntu) as a compute target it’s also possible through the AML service.
Datastores –
When it comes to machine learning experiments its normal to have large amount of data. These data may sit in your Azure storage. Datastore is the storage abstraction over an Azure storage account which then you can use inside your machine learning experiments.
Data labeling –
A cool new feature for data annotators. Right now, this supports Image classification in multi-label / multi-class and object identification (bounding box) annotations. The annotator should not have to have an Azure subscription. You can easily outsource your tedious annotation workload through this feature.
This is just an overview of the options we are having with new Azure Machine Learning Studio. It’s pretty clear that Azure team is going to get all the ML related services under one umbrella. Let’s discuss some cool use cases and tips on using these services in next blog posts.